EDUCATIONAL TECHNOLOGY FOR PK-12
Introduction
This website will serve as an introduction to some of the educational technology materials and resources that you will likely see in school classrooms and libraries. It's only a small sample of the tech that is now available, but I've chosen the items that not only seem to hold the most promise for creative and innovative teaching and learning, but are also easy to learn and use, and relatively inexpensive.
The Virginia Computer Science Standards of Learning
Before we start with the tech materials and resources, it's important to know a bit about the Computer Science (CS) SOL's. They have been around for a couple of years, but school districts are just starting to talk about how they can be introduced into classrooms. They are set for grades K-8 and some secondary CS courses. There is no associated SOL test, but some local districts are developing Performance Tasks for the standards. The focus in K-8 is on integration with other areas of the curriculum. This can seem a bit intimidating, since even the K CS standards require a knowledge of algorithms and a block-based programming language (it's actually not that difficult as you will see in the section below on Coding and Pre-Coding Materials and Resources.) You can find the standards and the associated Curriculum Framework here: http://www.doe.virginia.gov/testing/sol/standards_docs/computer-science/index.shtml
Pre-Coding and Coding
Pre-coding refers to the development of skills associated with programming, but without actually writing code. There are a number of great devices for building these skills and they are applicable for K-5. I'll list them by age level and provide a link to a video that gives you an ideal of how they work. The first three items are for pre-coding.
Coderpilar. This is for the youngest kids. Each coderpilar segment is a command and they create a
"program" by selecting the segments and piecing them together in the proper order. https://www.youtube.com/watch?v=iYEKD1Befg8
Botley. With Botley, the commands are buttons on a remote that need to be pressed in a certain sequence (a program) to get Botley to go where you want it to go. https://www.youtube.com/watch?v=zjE8nOjucD0 There are also several at-home activities for the Botely robot here: http://blog.learningresources.com/category/at-home-botley-activities/
Ozobots. Ozobots are small line-following robots. But they can also read color sequences, so a program is created by drawing lines with color sequence blocks. Each color sequence represents a particular command. For example, a red-black-red block can be the instruction for doing a U-turn. You can use any kind of marker and regular paper. Ozobots also has a great website with lots of materials for educators - www.ozobot.com Here's a short youtube video showing ozobots in a classroom: https://www.youtube.com/watch?v=_nOeCh_KOJM
ScratchJr. Scratch is a very popular block-based programming language. The version for younger kids (as young as 4) is ScratchJr. ScratchJr is available as a free app for tablets and can be used on Chromebooks. You can have multiple characters, different backgrounds, recorded sounds, photos. It's very easy to learn and there are lots of online how-to videos. The website is www.scratchjr.org
Here's how it looks:
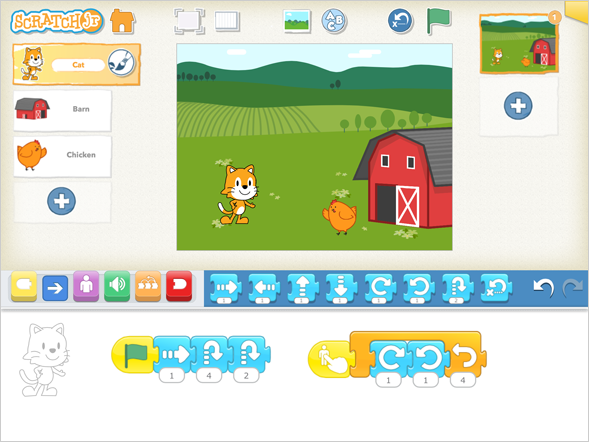
The blocks are the commands. So, rather than writing code such as "Go to...", or "If...Then...", you are choosing blocks that represent those actions, then connecting those blocks. In the program above, the Cat will, when the green flag is pressed, go forward one step, jump four times, then two more times. And, if you touch the Cat, it will spin four times.
Scratch. Scratch is a block-based programming language for older kids. It works the same way as ScratchJr, but there are many more options for instructions. It's free online program, so works well on laptops and computers. The website is www.scratch.mit.edu The screen looks like this:
Mixed Realities (Augemented Reality, Augmented Virtuality, and Virtual Reality.
In Augmented Reality (AR), you add a virtual element (using your phone or a tablet) to a physical object or setting. What if you do the reverse - add physical objects to a virtual setting? That's Augmented Virtuality (AV). If you are using a headset and you are completely immersed in a virtual setting, that's Virtual Reality (VR.) All of these fall under the heading of Mixed Reality (MR). This area has great promise for teaching and learning. I've listed some resources and sites below. You should definitely try the Google Expeditions app and the Sketchfab app. They are free and you'll get a good sense of what you can do with AR. Also take a look at the Quiver app - it provides a whole new way to think about worksheets.
To begin: go to this website: https://k12augmentedreality.blogspot.com/
and browse the articles. Try some of the following apps on your phone or tablet (all free):
- Google Expeditions
- Sketchfab
- Quiver Coloring app (the free version)
For the Quiver coloring app, you can go to the site and download some of the free PDF files. Try the Education Starter Pack: http://www.quivervision.com/education-coloring-packs/#education-starter-pack This is really a different way to think about worksheets.
One of the shortcomings of this stuff is that what you're seeing is pretty much limited to a phone or tablet screen. There are ways around this - the Chromecast device and the Apple TV device allow you to project what's on your phone screen to a classroom projector.
For the Augmented Virtuality (AV) component, take a look at some Youtube videos - here's a good one: https://www.youtube.com/watch?v=Gz_i-jnojUs As you can see from the date, OSMO has been around for a couple of years, but it's now starting to appear in classrooms. A second set of AV materials is from PLUGO - here's a quick intro video: https://www.youtube.com/watch?v=KtZ44e62YjY We have these devices and I hope to get the chance to let you practice with them a bit. One thing to consider for OSMO, you can use an IPad or a much, much, cheaper Amazon Fire tablet.
3D Design and Printing.
3D printers are becoming more common in classrooms and school libraries now. They have become less expensive and easier to use. This means educators can have their students focus on designing objects to print rather than just trying to get the printer to work. And you can now print with more than plastic - bamboo, copper, carbon fiber, and many other types of materials are available now for use in 3D printing.
So the question is not how to print, but what can I print. There are three ways to develop objects for printing. The easiest is to download them. Go to the Thingiverse site https://www.thingiverse.com/ Take a look at some of the thousands of objects that can be downloaded for free.
You can also use free design software to design your own objects. Tinkercad is a very popular online program for very simple or very complex designs. You can find lots of Youtube tutorials about Tinkercad. FREE, but you should create an account (just e-mail and password) so that you can save designs. https://www.tinkercad.com/
You can also scan existing objects and create 3D printable files. The desktop versions are a bit expensive, but now apps for scanning are beginning to appear. On such app is Qlone. Here's how it works: https://3dscanexpert.com/qlone-smartphone-3d-scanning-app-ios-android-review/ The app produces a very good scan and gives you a number of ways to use the 3D file, including exporting as an STL file or using the file for Augmented Reality. The app is free, but some of the options are not. You do have to pay for STL exports. I especially like it for the AR feature.
To see how some of this looks, you can go to a website I developed for a French NGO that works in Borneo to protect habitats for animals such as orangutan and pygmy elephant. https://hutan3d.blogspot.com/
Museum in a Box.
Something very new - the Museum in a Box https://museuminabox.org/ I have one of these and demo'd it at the local STEM Summit and it generated a great deal of interest from both educators and engineers. Take a look at the website and think about how you might use this. Think of what kind of items might be in your museum.
Comments
Post a Comment